Knowledge Base
Automated Data Cleanup (Legacy Data)
THIS ONLY APPLIES TO INSTALLATIONS WITH A SESSIONS.PPDATA FILE
Overview
We're currently hard at work to implement integrated data cleanup within the PingPlotter application, but in the meantime, we've created a standalone tool to help keep your PingPlotter data from taking up unnecessary space. Here, you can find our data cleanup tool (PPDataMaintainer), along with some instructions on how to automate the process.
The Batch File
We've included a sample batch file that can serve as a great template. To keep things simple, we have specified the location of the cleanup tool to be in PingPlotter's installation directory, "C:\Program Files(x86)\PingPlotter 5\", and have elected to delete data older than seven days. You're welcome to place this file in any meaningful location of your choosing.
Once you've downloaded the batch file, edit the text to reflect the location in which you've stored the cleanup tool. Additionally, set the appropriate parameters for data deletion to match your needs. Continue reading for more details on how to alter the batch file.
Text to change:
Referencing where you've placed the cleanup tool:
"C:\Program Files(x86)\PingPlotter 5\" should be changed to the full file path you've placed the cleanup tool in.
Referencing where PingPlotter's saving its data:
"%programdata%\PingPlotter 5\sessions.ppdata" should be changed to the directory that PingPlotter is saving its data to.
IF RUNNING AS A SERVICE: This path can be left as is.
IF RUNNING AS AN APPLICATION: %programdata% should be changed to %localappdata%.
IF USING A CUSTOM DATA DIRECTORY (applicable to both service and application instances): Navigate to Edit -> Options -> Auto-Save Data. Change the entire file path in quotes to the path listed in the "Data Storage Folder" text box.
Specifying data to delete:
"--deletedaysold 7" references the maximum age of the data, in days. You can change this to any integer value.
Alternatively, you can use the following in place of the above argument to remove data before a specified date; feel free to change this value to a date of your choosing:
"--deletebeforedate 2/2/2018"
Automated Cleanup
By using the provided cleanup tool and batch file, you can easily set up an automated task with Windows Task Scheduler. You'll want to choose the option to "Create Task"; using "Create Basic Task" will not contain a function that allows automation to complete successfully.
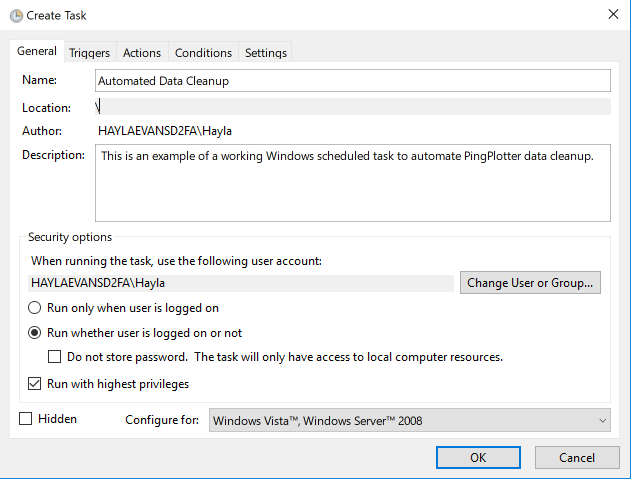
General
Here, you can name the task and give it a description. We've chosen to run whether the user is logged on or not; you can make your selection based off appropriate organizational protocol. It is imperative that "Run with highest privileges" is selected; the automation will not function unless this is selected.
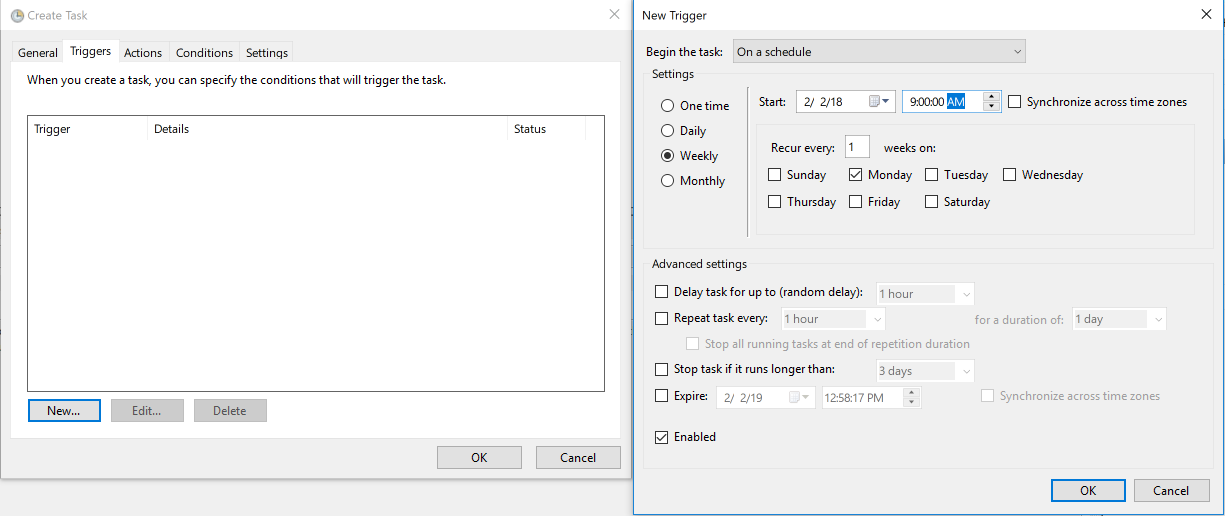
Triggers
The task can be set to run as frequently as you'd like. We'd recommend setting a trigger to recur on a weekly or monthly basis.
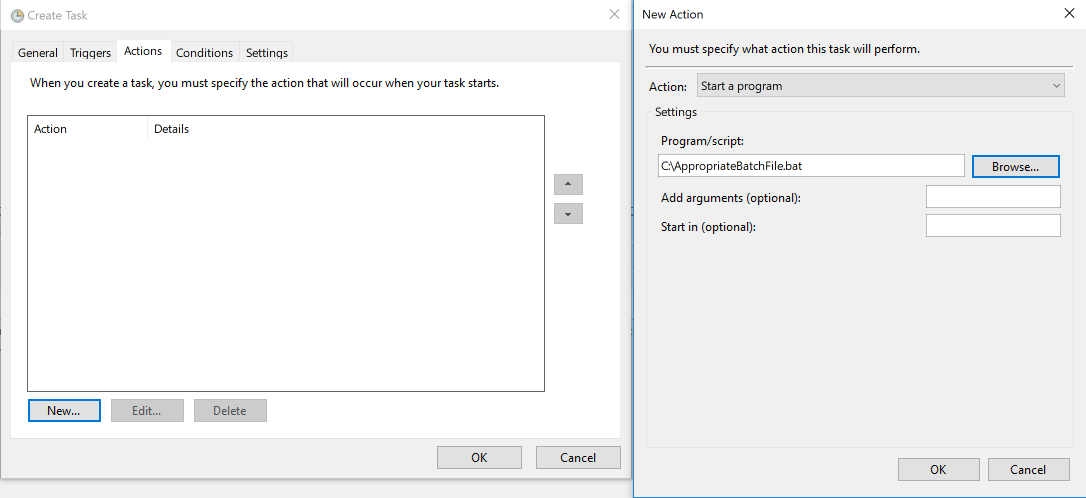
Actions
Set the action to start a program, and browse for the batch file you've downloaded and edited. Using the batch file will stop the PingPlotter Windows service (if applicable), prune the files necessary, and start the Windows Service once again; this will all be unattended, and will close upon completion.
Conditions, Settings
For simplicity's sake, we have left these values at defaults. You're welcome to alter these values to fit your needs.
Finishing up
Once you've performed all these steps, the automation should run successfully on the schedule you've dictated. Feel free to alter settings and experiment as needed; you will always know what's best for your data and your organization. Should you find yourself in need of support, please don't hesitate to reach out to support@pingman.com and we'll gladly help however we can.


 1.62 MB )